Racing Tips and FAQs
By Sal & Peter Biondo
This page contains tips on how to effectively get the most out of some of the products we sell. Along with full instruction sheets, at times we insert tip sheets to help you better apply the products to your racing application. We feel that our best customers are informed customers. We want to share our years of championship racing experience in an effort to help our customers to understand our team and the unique product line that Biondo Racing Products has to offer.
- “How do I get my suit or other apparel RE-CERTIFIED?” 1/30/19
- “How do I clean / wash my firesuit?” 7/23/14
- “How does the Starting Line Control (Enhancer) work?” (A video by American race Cars) 12/21/23
- The Big Picture = More Round Wins A MUST READ! 5/18/10
- “Our Guide to Weather Stations and Predicting” Updated 3/2015
- Using a Throttle Stop Updated 03/15
- Electric Solenoids (push type) Wiring Help 1/22/13
- PRACTICE TREE EFFECTIVENESS AND SETTING ROLLOUT Updated 10/17/08
- Using the MEGA 100, and MEGA 200 Delay Boxes.
- Using the MEGA 300, and MEGA 400 Delay Boxes.
- Using the MEGA 450 Delay Box.
- Tips for a struggling “Bottom Bulb” Racer
- A Quick Tip to improve your “Finish Line Driving”
- This is more like a travel tip – Grease Your Bearings!
How do I get my suit or other apparel Re-certified?
Biondo Racing can not do your Re-cert. Each item needing recertifying goes to the corresponding manufacturer. Normally they require a phone call, to set up the return. These companies are very familiar that many need the turn around time to be quick!! Go to the manufacturers website, and you may even be able to print a return form to set up the re-cert. Our most popular call is for Sparco re-certs, so that phone number is being provided. Sparco (949-797-1750)
How does the Starting Line Control / Enhancer work ?
Check out the video below produced by American Race Cars to take a deeper look at starting line controllers, and how they work!
How do I clean / wash my firesuit?
Sparco recommends dry cleaning your suit to preserve the life of your safety garment for as long as possible. Your Sparco Race suit should be treated with the same respect as your Sunday Suit. After each driving session, please remove the suit whenever possible and hang dry to remove moisture and to prevent grease/oil from staining the suit while working on your car.
Washing instructions: If you wash your suit, Sparco recommends hand washing or washing it in on a delicate cycle in the washing machine inside a garment wash bag with COLD water. Please make sure that the belt and collar are closed on the suit, to prevent the velcro from causing damage to the nomex fabric. Woolite soap is recommended as it is a non-abrasive detergent. DO NOT use bleach or anything similar. When drying the suit, always let the suit drip dry, indoors (out of the sunlight).
The Big Picture = More Round Wins
Written by Peter Biondo
So here you are in round 7 of the Spring Fling 20’s against one of the elite racers. Your reaction times in round one to six have been between .008 and .014. The big question; do you make any changes to the delay box?Conventional wisdom would say no. Conventional wisdom says to “race your own race”. Conventional wisdom says stick with the .011 reaction time average that got you this far. I am here to tell you that I agree with conventional wisdom in a lot of areas of life but racing is one area where I put “playing the odds” before conventional wisdom. By playing the odds I am not talking about overestimating or underestimating your opponent as that is one of the leading causes for people losing rounds. Playing the odds in racing means you put yourself in the best position to win a certain round based on the history and the current situation. If you are in round 7 of a big buck bracket race against one of the best in the business chances are he is going to have a very good reaction time. Taking .003 or .004 out of your delay box would be a smart move and could very easily make the difference in winning or losing that round (especially if it is an 1/8th mile race where reaction time plays a big role). If you are a non delay box racer you can bring your rpm up 100 rpm. You get the point here. You are now setting up “tighter” on the tree based on both what you know of this elite opponent, and the fact that you are deep into eliminations and both you and your opponent have had a lot of looks at the tree. So increase your odds on winning the round by taking some out of the box. In the following journal I am going to get specific and into detail about what I call “situational racing” and how to increase your chances of winning “that round” whether that round be round one at a $200 to win local race or the final of our Spring Fling 20’s. It all has to do with stepping back, looking at the big picture and taking calculated risks with the ultimate goal being turning on more win lights.
A lot of times in drag racing we get in a zone. This is a good thing. But it is not good if we are so much in a zone where we lose sight of the big picture or the current situation at hand. There is a lot to be said to being a robot and zoned into the tree and being one with the car but if you are too extreme and not paying attention, it could cost you a bunch of rounds and can even cost you that one ‘big’ round. Let’s say Tiger Woods has 7 shots to get the ball in the hole to win the US Open. He knows he can most likely make the hole in 4 shots if he plays his normal game. His caddy is going to tell him to take the safe way to the hole and make it in 5 instead of trying for 4 and taking a risk of hitting it in the pond. The caddy is looking at the big picture here for Tiger. In racing, most of us do not have a caddy or coach. We have to “be observant” as Troy Williams once said and pay attention to the situation so that we can better figure out what gives us the best chances of winning “that round”.
Now what if I told you that you can raise your chances of beating a guy who knowingly has more talent and more seat time than you? That’s right. The reality is… he has more seat time, is more talented and can drive both ends of the track better than you. Reality is you have less than a 50% of beating this racer when you line up against him. Let’s say you have a 40% chance of beating this racer when you line up against him/ her.
Let’s put all this talk into a real life scenario:
You are about to race against a heavy hitter (let’s refer to him as HH) who you know holds a bunch of numbers. The big question is “how do I race against HH”. Before I answer this question that is very commonplace throughout the pits, let’s talk about the reasons for “holding numbers” or “dialing up”. The answer on whether to hold a bunch of numbers in general (or dial “honest”) should be based on three things. The first and most important is how comfortable are you doing this and does it fit your driving style? If you aren’t comfortable doing this I would suggest not to do it until you get comfortable and I want you to get comfortable sooner than later because there are going to be rounds later in your career where you can dramatically raise your odds on winning if you have some in your pocket. On the other hand if you are not comfortable doing this you will only lessen your chances of winning the round by making a plan and then not executing properly. Secondly, how good is your car running on a particular day and how well are you hitting the tree? If your car is running within thousandths of a second (the track is tight and the air/ weather isn’t drastically changing) and you are killing the tree then that is less of a reason to hold some in your pocket. In most cases in this scenario, you can put down good enough numbers without doing much at the finish line and let’s face it, this is a numbers game and good numbers/ tight packages is what wins races above and beyond EVERYTHING else. On the other hand if the track is loose and the weather and wind are changing by the minute and your car isn’t stringing tight runs together, than that is a situation where you are better off to hold a few. The third (and probably most interesting factor to most of you) in whether to hold numbers or not would be; who is your opponent on that particular round? Is he/ she a heavy hitter that tends to hold a bunch of numbers and is going to size you up at the finish line? If this is the case and you feel comfortable about dialing where you are holding a few hundredths, you should do so. This is what I call situational racing and it can increase your odds of beating this racer quite a bit. In fact, your chances of beating HH just went from 40% to 60%. That’s right, if you make the right plan (hold some numbers) and execute it properly the odds of beating your bracket racing hero just swung in your favor. Let’s step back and look at the big picture here. The reality of the numbers looks like this. You are running well and your car just ran 7.422, 7.427, and 7.426 in the previous rounds at 180 mph. You are confident you can be between .006 and .014 on the tree. If you dial honest against heavy hitter chances are the race and odds of him winning will look like this:You go .011 on the tree and run a 7.428 on a 7.42 dial (wide open/ no brakes). Chances you win the round against “heavy hitter” is 40%. Heavy hitter is .007 RT and is beside you for the last 300 feet putting a wheel on you and snugs the stripe up to .009 and runs a 7.323 on a 7.32 dial. You get back to the pits shaking your head and telling your friends, “man he made that look easy”. Now let’s step back and look at the big picture here and try to increase your odds on beating HH. Why did he just make that look so easy? The answer is because you gave him a stationary target (and enough room) to size you up making it easy for HH. From HH’s eyes the race and his decision was easy (despite you putting down a good run), in his brain he says this during the race “I am catching him early enough to kill the amount I need to kill and still take the stripe”. And because HH is such a good driver he can do just that without blinking and eye. How can you help your cause here? By first making the race appear different to him, and secondly and more importantly, giving him a moving target to work with. Take it from me, the combination of these two things will make heavy hitters job much harder. Hold 2 or 3 numbers and pick your spot on the track that you (have learned) to kill that amount where let’s say you go mid to high dead on your dial but this time on the brakes. In this case let’s dial up to a 7.45 and hit the brakes (safely of course) 20 feet before the first cone and run a 7.458 on a 7.45 at 166 mph. You have the same .011 tree and he has the same .007 tree BUT you have just dramatically increased your odds on beating HH. Now your chances of winning that round are 60% instead of 40%. That’s right, you are now a favorite to beat your “hero”. Why are you a favorite? Because you made the race look totally different to HH. HH catches you much later in the run, he knows he is dialed to break out and either A) decides to snug the finish line up and does a good job until you dump and give him a “(backwards) moving target” forcing him to take too much at the stripe and break out by .01 or .02, or B) he decides to dump and give you the finish line hoping you break out and in this case he is .01 over the dial and you are dead on. Either way, you have greatly increased your chances on beating the HH. Sure you still have to execute and be disciplined to pick your spot on the track that you have learned to get rid of .03 but taking this calculated risk in this scenario will turn the percentages in your favor and lead to many more win lights against this style and caliber of driver in the long run. On the flip side to this scenario let’s assume you are dialed a 7.30 and you are running against a 10 second car. In this situation, chances are, he is not going to be able to judge you (size you up) because of the mph difference and how fast you are coming on him. Therefore there is much less of a reason to hold numbers and to give him the “moving target” because it’s hard for him really to judge you, “the target” anyway. You are still the target in his eyes as he sizes you up but because you are closing in at such a rapid pace, you are already a moving target. In this situation you can actually decrease your odds on winning the round by throwing the extra variable of you holding numbers/ having to get rid of numbers into the mix. Luke Bogacki wrote some columns on “Spot Dropping”. There, he made a point to harp on safety, and I’d like to do the same. Being able to safely “kill” some ET and “Drop” at a given point on the race track takes a little practice and getting used to. We’re certainly not advocating any method that causes you to lose control of your vehicle. Your particular “spot drop” or method of killing ET can be very personalized. First and foremost, you need to develop a method that you feel comfortable with that does not endanger you or your opponent.
Above I discussed starting line and finish line techniques along with ways of approaching different rounds and different situations. A big question should be “wait a second, what happened to simply playing my own game and sticking to what I do best?” Don’t get me wrong as my philosophy in racing relies heavily on doing what you do best and playing to your strengths. If a pitcher’s best pitch is a fastball then in most key situations, he should throw a fastball. Above and beyond every starting line and finish situation that I mentioned previous should be that you play to your strengths. BUT, if the same pitcher goes up against a batter that normally can see the fastball so well he normally knocks it out of the park, then the coach signals him to throw a curveball. This is why it is so important to grow as a racer and not get stuck in just one routine. Sure you should try and get the basics of bracket racing down pat before you try these more advanced techniques. If you don’t know how to effectively and safely get rid of a few at the stripe then don’t do it until you practice it enough in time runs where you can do it. Until then, focus on other strengths (in numbers) in your program like your reaction times and getting your car to run more consistent. Either way, good packages have a tendency to light the win light but if you are able to look at the big picture, you will, at times, see different round situations where you can greatly increase your chances of winning by mixing up your game and getting to those good packages in different ways. My suggestion? Challenge yourself. Don’t let fear get in the way of your growth and advancement as a racer. Take chances (at the right times) and you will take your driving to the next level. It’s a lot easier to stay in a comfortable place where you want to take the safe way out but believe me, by doing this you will never advance. If you do lose, don’t make excuses. Look defeat in the eye and learn from it. Look at the “WHY”. WHY did your car just fall off 2 numbers? Why did you take too much stripe and breakout (what was going through your mind and what were you seeing going down the track)? WHY were you late? WHY did you just pick up .015 in your 60’ time? Always look into the why. Most people would rather place blame rather than look into the why because it’s the easier way out and requires less effort (thought). You should be learning something every pass down the track. If you look into the why and honestly answer it, the chances are you will not make the same mistake multiple times. This leads me to my next section- the mental side of racing.
All forms of sports require a mix of mental and physical talent to be successful. I can’t think of a sport that is more lopsided on the mental side than drag racing. There is so much that can be said about the psychology of racing but because of space limitation, I will stick to the single, most important one. The single and biggest barrier that stands between you and the win light… Fear.
I can remember being 22 years old and very new at national event racing when a well known and very successful racer was paired up with me. Hell yes I was scared. On top of that he did everything he could to intimidate me and try to get in my head. He was smart, a good driver and very experienced. He knew well enough the havoc fear would play in opponents minds. Here I was a newbie to the national event scene and I was about to face the best. Yup, David vs Goliath. Fortunately I was aware enough to step back and look at the big picture and that’s when it hit me; “this is a numbers game and I can put up numbers just like he can.” As Jeg Couglin once said “preparation is king” and my car and entire racing program was prepared to do the job. That triggered confidence in me, eliminated the fear, and helped me to win the round. I also took a chance and held some numbers in my pocket, executed the plan perfectly and forced him to breakout. Say those words “this is a numbers game and I can put up numbers just like he can.” to yourself whenever you feel like you are at a disadvantage in a certain round and it puts everything in perspective and will wipe away any fear you may have had to race your opponent. Remember, this is not a wrestling match where you are 90lbs and he is 300lbs. Most of the time the cars are equal or close in the consistency department.
Really, when I speak of fear in racing I am talking about fear of losing. Worried about who you are racing against (that you will lose), scared you may redlight (and lose), worried that you may be late (and lose), scared that you may not have the car dialed in right (and lose). All in all, just the simple fear of losing. Again, when fear enters your mind, step back for a second and look at the big picture. This is a numbers game! Do your homework before the race and before the round and by the time you make it to the staging lanes you should be prepared to lay down good numbers and good numbers can beat ANYBODY! When racing without fear you WILL get MUCH better results, period. Have you ever watched someone during a test and tune go .00 something on the tree all day long? I know I have. It’s because there is zero fear on a test and tune session. The racer is not worried about red lighting and not worried about losing. The key is to adopt this mindset when the chips ARE on the table. Only thoughts of executing your game plan (regardless of who is in other lane) and what your last run was like. The biggest link I see with fear and losing a race is overestimating your opponent. Overestimating your opponent causes your inner confidence to go down and your subconscious tells yourself that you are an underdog which in turn leads to fear. This fear leads you to do things you normally wouldn’t do like perhaps try too hard which takes you out of your zone. Now your chance of winning the round just went down significantly.
There is a lot more that could be said about starting line, finish line, dial in, race strategies, and the part psychology plays in racing. For now, regardless of how new or seasoned you are to the sport of drag racing, my hope is that you will be able to tie this column together to your racing program. When you are about to line up for your next round, remember to step back and look at the big picture, run a game plan through your mind on how you are going to turn the win light on, race smart, and race with zero fear. And above all, play to your strengths. You will be surprised how many more times the win light shines in your lane.
Biondo Racing Product’s Guide to Weather Stations and Predicting (CLICK HERE FOR Printable PDF file – W/S Tips)
by Peter Biondo (March 2015)
I put together this weather station guide to help you get the most out of your weather station. If you are in the market for a new weather station, please consider Biondo Racing Products at www.BiondoRacing.com or 800-332-1320. Our goal with this is to help our Biondo Racing and Spring Fling customers turn on more win lights.
A)Taking Weather Readings Trailer Based Weather Stations: The first and most important step in predicting your ET or throttle stop settings is taking weather readings properly. If you are using a trailer mounted weather station such as the Altacom 2 or Performaire Weather Center, there is not much you have to worry about as the fan aspirated sensors utilized by these 2 systems will accurately and automatically take weather readings for you all day long. These stationary weather stations use high end weather sensors and incorporate a continuous fan blowing through the sensors which makes it the most fail safe way to get accurate readings with minimal effort. Add a pager to the mix and you have the ultimate in accuracy and convenience.Hand Held/ Portable Weather Stations: With a hand held / portable style weather station, it is very important to take care in where and how you take your weather readings. To obtain the most accurate readings you should follow these guidelines:
- Allow 10 seconds after turned on for barometer to settle.
- Take readings in the open air, out of direct sunlight, and away from hot vehicles.
- Take readings in the same place every time. (whether in the lanes or the pits)
- Use common sense when taking weather (don’t leave it in your hot racecar for all day and hold it out the window to take the weather, it may take up to 10 minutes for the heat to dissipate from the unit.)
- A hand held weather station that has a built in fan to blow over the sensors will be more forgiving in where and how you take your readings.In summary: you can achieve the same accurate results with a hand held weather station as you would with a trailer based weather station, but it does take a little bit more effort on the users’ part.
*At Biondo Racing we use and recommend a trailer based weather station for the highest accuracy, but if this is out of your budget, we can suggest a high quality hand held/ portable weather station.B)Weather and Predictions After gathering accurate weather readings from your weather station, the next step is making predictions to your vehicles performance. The most common question I am asked is “should I do manual predictions or should I use a program to do the predictions for me?” You should learn how to do the predictions on your own first, regardless of whether you decide to use a program to predict. Like anything else in life, if you really want to master something you should not only look at results but you should look into the “why” and “how” you get to that result. Later on, I will talk about using prediction programs, but before that I want to share some of the “why’s” and “how’s” on weather and how it effects your vehicles performance so that you will not only get a good understanding of this, but you will also be able to effectively predict your vehicles performance on your own. After learning this, you could use the information to enter the weather factors into a computer based prediction program if you choose to use one.Predicting On Your Own As we would all love to be able to push a “magic button” and automatically be able to predict to the thousandth of a second, we also have to realize that there is a lot more to it than that. There are many weather variables and it’s important to look at these variables and see how they effect your vehicles performance. This all starts with taking efficient notes- logging all of the (below 4) weather variables in your logbook. Take the logbook home with you and study it. Pretty soon you will see a pattern developing and you will learn how much of an effect each weather variable has on your vehicle, and put a ‘factor’ or ‘weight’ on each variable.I recommend breaking it down the ‘weather’ into 4 important components:
1) Density Altitude OR Temp
2) Humidity
3) Barometer
4) Vapor Pressure OR Water grainsThese 4 variables are what I found to be most effective in predicting. Notice on variable #1, I wrote Density Altitude OR Temp. You should choose one or the other, but no reason to track both as you would be ‘double dipping’ as Temp already plays a big part in DA. You will also notice #4 where I wrote Vapor Pressure OR Water Grains. Same thing here, pick one or the other as they both move in the same way and it will be double dipping to put weight on both of them. Gasoline burning vehicles tend to be more effected by Variable #1 (DA or TEMP) and less effected by moisture (humidity and vapor pressure/ water grains). Therefore, a big percentage of your cars response to weather will be based on Variable 1. It takes a smaller move of DA or Temp to change your car .01 in ET when running on gas than if you were running on alcohol. Also, the more efficient your engine/ carburetor/ converter combination is, the more it will take for the DA or Temp to move to change your car .01 in ET (a high cubic inch/ high compression bracket car with a big carburetor is likely to move less with a change in Temp or DA than would an 11 second stocker with a 750 Holley). Alcohol burning vehicles are less influenced by Variable 1 (DA or Temp); it takes more of a DA or Temp change to change your car .01 in ET than if you were running on gas. Conversely, you will put more weight on Humidity and VP/WG (moisture) changes while running on alcohol. After studying your logbook, you will soon learn how much of a factor/ weight to put on each of these 4 weather variables. It is very important to put a weight on each of the 4 variables, to look at them independently and independently compare them to a baseline run. After looking at them independently, you can tally up the total sum on how much faster or slower the weather is from a previous ‘baseline run’.Remember these 3 important steps in predicting ET:
1- After using the weather station for a while and taking good notes in your logbook, you will be able to narrow down and put a very accurate number (factor) on each of these 4 variables. In other words, you will be able to narrow down how much of a change each of these 4 variables is needed (independently) to change your car .01 in ET.
2- Pick a baseline run that you will be dialing off of. It is very important to use logic and taking care in picking a baseline run to predict from. A baseline run typically should be your most recent previous run you made, or if it’s a new day it could be a run that you made on a previous day at the same time of day.
3- Take the current weather conditions (looking at these 4 important weather variables and each independent factor). Compare these 4 factors to your baseline run’s weather conditions (4 factors). After comparing the change of each of the 4 weather variables independently (and then totaling them up), you can come up with an accurate ET prediction.After the 4 weather variables, now factor in Wind and Track Conditions to get a final dial-in.
Wind
Wind is often an underplayed factor especially when predicting ¼ mile performance. It is also the hardest variable to pinpoint because it’s always changing and swirling.
- Pick a reference point for how and where you will determine the wind at each track and come up with an average wind reading over a period of 20 seconds. It could be a flag or your hand held windmeter at the 1000’ mark, your stationary wind meter on top of your trailer, burnout smoke, or a combination of these.
- A generalized chart (average) for wind would be a 4 mph tail wind = .01, a 7 mph tail wind = .02 and a 10 mph tail wind = .04. The same applies for headwinds except the value for headwinds will tend to be slightly higher because you are going “against the grain” so to speak. Of course your ‘wind factor’ could be more or less depending on vehicle shape and speed.
Track Conditions:
Track temperatures and track prep will also affect your vehicles performance. The ideal track temperature is in the 70 to 90 degree range. Here the rubber on the track is the tightest. The further the track temperature gets from this ideal temperature, the more negative (slowdown) effect on your ET. Too cold of a track and there may not be enough adhesion. Too hot of a track and the surface tends to be greasy and is susceptible to bald spots. As with any other variable, pay attention and share information with your buddies. Have 500 cars been down each lane since the track was prepped last? Is the sun beating down on it on a hot day? How far the track temp from the “ideal temp” is and which direction is it heading? What were the characteristics of this track the last time you ran on it at this time of the day?
Summing it up
Hopefully this will help you get the most out of your weather station. As you will see and hear, there are a lot of ways to use weather stations in predicting vehicle performance. No matter the case, there are two things you always want to keep in mind: 1) make sure you have a weather station that is accurately gathering data for you and 2) always use common sense, pay attention, and take notes on how the above mentioned 4 weather variables effect your cars performance.
Visit www.biondoracing.com or call 800-332-1320 for the latest in weather station and the best pricing. Talk one on one with the racers at Biondo for the best weather station & prediction advice for your specific vehicle/ application.
Throttle Stop Tip Sheet (CLICK HERE FOR Printable PDF file – T/S Tips)
(Written by Peter Biondo March 2015)I put together this throttle stop tip sheet to help you get the most out of your throttle stop. If you are in the market for a new throttle stop, please consider Biondo Racing Products at www.biondoracing.com or 800-332-1320. Our goal is to help our Biondo Racing and Spring Fling customers turn on win lights.
One question I commonly get asked is: “Is it beneficial to shift on time (have a timer shift the car during the T/S duration) while on the stop?” The answer largely depends on how much under your index your car runs. Example: If your car runs well under the index (over 1 second under the index), you can gain consistency by shifting on time. Cars running less than 1 second under the index will most likely NOT benefit from shifting by time.
There are 3 major benefits for shifting on time:
- The car will come off the stop in high gear; this creates a smoother transition from part to full throttle and also lessens the chances of spinning the tires when coming off the stop.
- The rpm’s ‘on the stop’ will be much more stable when in high gear. In other words, your stop rpm’s will not climb or climb at a much slower rate when in high gear compared to low gear. This will result in more consistency and a more predictable throttle stop ratio.
- Shifting early in the run (shifting on time) with cars running deep under the index will knock off some ET on its own…making it where you can run a more manageable duration in your Stage 2 setting.
- FINDING THE RIGHT THROTTLE STOP ‘CLOSED POSITION’ OR ‘BLADE ANGLE’
Finding how much to mechanically shut your throttle down is crucial. This is commonly referred to as ‘blade angle’ or ‘throttle stop rpm’. I have found 3 blade angles that work well (find the settings below). The most accurate way to adjust your “blade angle” is by RPM- (the rpm your engine drops to while the throttle stop is engaged). Once you have the right throttle stop RPM for your application, you are done with the mechanical part of it and all ET adjustments should be done with a timer (your Stage 2 setting).As mentioned above, I have found 3 blade angles that work well for different applications. I broke this down into 2 sections; the first section of recommended settings is for racers shifting on RPM while the second section is for racers shifting on time.
Recommended Throttle Stop RPM settings when shifting on time:
- A “throttle stop rpm” of 4100-4200 if your car runs 1.5 seconds + under the index.
- A “throttle stop rpm” of 4400-4500 if your car runs 1 – 1.5 seconds under the index.
- A “throttle stop rpm” of 4600-4700 if your car runs .3 to .9 under the index.
Recommended Throttle Stop RPM settings when shifting on RPM:
A “throttle stop rpm” of 3900-4000 if your car runs 1 second + under the index.
- A “throttle stop rpm” of 4300-4400 if your car runs .3 to .9 under the index.
- A “throttle stop rpm” of 4700-4800 if your car runs less than .3 under the index.
2) RECOMMENDED SETTINGS FOR WHEN YOUR T/S COMES ON (Stage 1 of TS timer)
Before figuring out your ever so important throttle stop ratio, you first must enter a number in Stage 1 of your throttle stop timer. This number indicates when the throttle stop will come on after launch. Most people prefer to have this number set early for high mph. I recommend having the throttle stop come on (Timer 1) to be between .1 and .3. Once you set this, you will never adjust it again. To adjust your ET you will be adjusting the TS duration (Stage 2 of your timer). 3) RECOMMENDED SETTINGS WHEN SHIFTING ON TIME
When shifting on time, I recommend having it shift a few tenths (.2 to .8) after the stop comes on. In general, the faster the car, the earlier you should shift. As with Stage 1, once you set this you will never adjust it again. A typical setup would be to have Stage 1 of the timer at .15 and have it shift at .6.
4) FIGURING OUT YOUR THROTTLE STOP RATIO
Whether you are using a weather station to predict a throttle stop or not, I highly recommend you learning your throttle stop ratio. The Throttle Stop Ratio is the effect the throttle stop time has on your ET. It is VERY important you learn this as this will be how you make your dial in adjustments when the weather changes between rounds. Example: If you add 2 tenths (.2) to your throttle stop timer and it changes your ET by 1 tenth (.1), then you have a 2 to 1 ratio.
To learn your T/S ratio do the following:
Make one run with a small amount of time (duration) in Stage 2 of your throttle stop timer (1 second). Make a second run with a large amount of time (3 seconds). Let’s say run # 1 was an 8.40 and run # 2 was a 9.40. You can now figure out your throttle stop ratio by dividing the change in the throttle stop time by the change in ET. The change in throttle stop time divided by the Change in E.T = T/S Ratio. OR in this case (2.00 divided by 1.00 = 2). This is called a 2 to 1 ratio. Learning your ratio will allow you to correct for changing air conditions. If you are using an ET prediction program, you will need to enter this ratio into your prediction program.Your throttle stop ratio is highly dependent on your “throttle stop rpm”. The following is a good baseline of what your throttle stop ratio would be at different T/S Rpms. (Keep in mind, you should check your throttle stop ratio to be sure as every combination could vary slightly).
- 3900-4100 T/S rpm results in a 2 to 1 ratio
- 4200-4400 T/S rpm results in a 2.5 to 1 ratio
- 4500-4700 T/S rpm results in a 3 to 1 ratio
These ratios are based on cars equipped with converters that stall in the 5600-6700 range. Extremely tight or loose converters will result in different ratios
5) YOUR THROTTLE LINKAGE (when running an In-Line Throttle Stop)
An “In-linkage” throttle control is sensitive to the throttle linkage system. It is very important to have an absolutely solid and rigid pedal stop. Without this, you can stretch your linkage causing inconsistency. If you are running a dragster with a throttle cable, your cable attaching bracket must also have a rigid and stable mount. Any flexing or moving will result in inconsistency.
6) SPEED CONTROLS- Necessary or not?
Speed controls are a way to slow down how fast a (CO2 powered) throttle stop either comes on or comes off. This can be especially beneficial in higher powered cars and on greasy, hot tracks. If you have a high horsepower car, and the car comes off the stop in first gear (shifting on rpm), it is a good idea to slow down the throttle stop opening speed to 50% to 60% speed. The Co2 powered stops that we sell have the capability to slow down and regulate this speed. This will keep your vehicle hooked up when the stop comes off and it will also be a smoother transition from part to full throttle. On the other hand, if you are coming off the throttle stop in high gear (shifting on time), it is not necessary to slow the throttle opening speed down as the transition from part to full throttle is smoother in high gear. There are also arguments about whether or not the throttle stop closing speed is more consistent if left at full speed or a slowed down. I have found that having the throttle slowed down slightly (80% of full speed) or at full speed seems to work well for most vehicles.
7) In Linkage throttle Stops VS. Baseplate Throttle Stop
This has been an ongoing argument since the birth of the throttle stop in the 1980’s. Which one is better? Which is more consistent? While one style may benefit a certain combination or driving style, the other may benefit another style or combination. Bottom line here is if you purchase a good T/S in either category, and follow these guidelines, you can have great success with both. I have been fortunate to win division and national championships using both styles.
Whether you are in the market for an in-line throttle stop or a baseplate throttle stop, at Biondo Racing Products we promise to offer the best products and advice the industry has to offer. Visit www.biondoracing.com or call 800-332-1320 to talk one on one with the racers at Biondo for the advice for your specific vehicle / application.
Electric Solenoids (push type) Wiring Help
Many electric solenoids used on today’s race car shifters draw high amperage. Therefore common wiring mistakes tend to show up as technical issues. Proper wiring and installation will make your solenoid more reliable and last longer.
High amperage solenoids, typically solenoids that do not use a spring to do the shifting,may draw from 24 to as much as 40 amps. Because of this amperage requirement it is important to supply sufficient power and ground to avoid a weak or overheating solenoid.
It is important that this style of solenoid be activated by a Normally Open Circuit, ( N.O.) from your RPM switch or Timer and through a relay. Refer to the instructions specific to your brand and model.
***For a high amperage two wire solenoid installation always use a relay of correct size and supply a 12 Volt wire, a minimum of 12 AWG, from a suitable power source to a relay line terminal and from the relay load terminal to the hot wire on the solenoid. For the additional wires needed on the relay, refer to the instructions specific to your make and model.
***The (voltage) supply wire should originate from the switched side of the battery disconnect switch. Running this wire from a typical fuse block, stud, or power supply point will many times be a problem and cause the solenoid to activate with less ‘hit’. These power supply points may not be capable of supplying the needed amperage when everything on that point is activated at the same time. On a two wire solenoid, Ground the remaining wire, typically Black, to a good chassis ground. Although, we would recommend running the ground direct back to a battery ground. Also, wire the relay as CLOSE to the shifter as possible. (typically 10-20 inches)
***These solenoids are voltage dependent. In other words, if you aren’t running an alternator (or you test the solenoid with the car off or with a weak battery), the solenoid will activate with less ‘hit’.
These instructions are generic and will not address all issues relative to specific models. There are many issues unique to each solenoid kit that can cause technical issues such as a weak solenoid, a solenoid that does not complete a shift, or a solenoid with a short life. Refer to the instructions specific to your brand and model.
PRACTICE TREE EFFECTIVENESS AND SETTING ROLLOUT
Using a Practice Tree Effectively and Setting Rollout
Dollar for dollar, the practice tree is the best investment a racer can make towards his racing operation. A minimal investment in money and time can help you achieve consistently good reaction times which is arguably the single most important part of a race. It will also help you build your confidence level and that in itself will lead to more round wins.
Setting Your Rollout
Let’s start by answering the question “What is rollout”? Simply put, rollout on the track is the distance it takes from when your car is staged to when your car breaks the starting line beams and starts the clocks. Breaking this down into time, it takes most cars between .22 to .35 from the time the car begins its launch, to the time it breaks the starting line beams. When using a practice tree, you are not using moving vehicles and racetracks; you therefore have to break the rollout down into time.
A very common question is, “What number do I use for rollout in my practice tree?” To simplify this, I broke this down into categories based on your tree type below. Ultimately, the most important part of this is you achieving consistently good reaction times on the practice tree and then hopping in your car at the races, hitting the SAME spot and hitting the same consistently good reaction times.
Rollout for Pro Tree and Top Bulb Racers:
I will break this down into 3 ‘tree types’. Top bulb racing, pro tree racing, and bottom bulb racing. The first 2 types allow racers to use a delay box and therefore are much easier to find your spot and to relate the practicing to you and your car. To do this set the delay box on the practice tree to the same delay box numbers you would use in your car. Now all you have to do is adjust the rollout until you get the reaction times you are looking for. It’s the easiest and most accurate way of matching your car’s rollout to the rollout you need in your practice tree. For instance, in my bracket dragster (top bulb/ .500 racing) I use 1.150 in my delay box at the track. I go to my Final Round 4 tree and set my delay box to the same 1.150. After a handful of practice runs I realize that I need to have .22 in the rollout to achieve .00 and .01 reaction times. If I use the same dragster to run super comp (pro tree/ .400 racing), I go about it the same way- set the delay for .050 (which is the delay I typically use for the four tenths pro tree), and after a handful of practice tree runs I see that I again need the same .22 in the rollout to achieve the .00 and .01 reaction times. The rollout for my dragster (the time it takes for my dragster to go from “staged” to “breaking the starting line beams” is .22, or 22 hundredths of a second). As a general guideline the “rollout” for a typical seven second dragster will usually be within the range of .22 to .28. A slower leaving 10 second door car will usually take longer to break the beams and typically have a rollout within the range of .28 to .35.
Rollout & Pro Category Type Cars (Top Fuel to Top Alcohol) is tougher to figure out because of the many different and ever changing mechanical aspects of car that effect the vehicle reaction time. The most effective way to use a practice tree for a driver of one of these classes is to set the rollout for .27 for a pro stock car or bike and for .32 for Top Fuel, Funny cars and .29 for Top Alcohol cars. Set the tree type to 4 tenths pro tree and try to get your reaction times as quick and consistent as you can.
Rollout & Bottom Bulb Racing:
Now that we explained rollout and how to set the rollout on your practice tree for ‘top bulb’ and ‘pro tree type’ racing, lets now talk about setting the rollout for bottom bulb racers. Bottom bulb racers do not use delay boxes and therefore any adjustments they need to make to their reaction times need to be made by adjusting your vehicle reaction time. There are many ways to adjust vehicle reaction, among the easiest ways to do this are changing launch rpm, front (and rear) tire pressure, and front tire size. In transbrake equipped cars you can do also do this by adjusting the travel of your transbrake button. Getting back to the practice tree, the following is the best route to take to help you figure out your rollout on a practice tree for a bottom bulb racer. The first thing you should do is set the tree to 5 tenths PRO TREE. Although bottom bulb racing is done on a 5 tenths FULL TREE, by taking the time to take a few hits at the 5 tenths PRO TREE, you will quickly and accurately figure out YOUR correct rollout because the PRO TREE gives you the easiest opportunity to react off the flash and correctly react to the light rather than anticipate the light. On an LED equipped tree such as the Final Round 4, most racers will see that they need a rollout within the range of .30 to .37. The fastest reacting person may need a .37 whereas a slower reacting person may need a rollout number closer to .30. Once you have taken a few shots at the 5 tenths PRO TREE and have set your rollout accurately to where you are hitting consistently good reaction times, you can then switch the tree over to the 5 tenths FULL TREE and feel confident that the rollout setting you have is correct. This is very important for training because now if you have a late reaction time or a red light you know it is you that reacted early or late and you will have no questions on whether the rollout number is correct.
A very important and common question then would be “Now that I have practiced and can hit consistently good reaction times on a practice tree, how do I relate this information to ME, in MY CAR, at the races. The answer is simple; hit that same spot on at the track that you have ”learned” on the practice tree. Now if do this and your reaction times at the track are on target (.01 and .02) reaction times, you are all set. Your car conforms to your “spot” on the tree and your job now is to consistently hit that spot that you have trained yourself over and over again. BUT, if you confidently hit your spot on the track and you are coming a few hundreths red or late, you then have to make changes to your vehicle reaction time. Adjust your leave rpm, tire size, tire pressure, or transbrake button travel to get where you want to be. A common mistake bottom bulb racers make is that they get in their car, hit the correct spot on the tree, and when it comes up red or late they try to adjust themselves to leave early or late. They end up out in left field. There is only one spot on the tree a bottom bulb racer should leave on to achieve the highest level of success on the bottom bulb. That spot is leaving as soon as they see the bottom bulb or “leaving on the flash”. This is the spot you have learned on the practice tree and the most consistent way in the long run.
The most effective way to use a practice tree
PHASE 1: The Big Picture
When you first get a practice tree, you should spend a considerable amount of time with it learning the “big picture”. Here I mean you should try to relate your car and your racing style (full tree/ pro tree/ bottom bulb/ top bulb) to it. Earlier, I covered setting rollout and different tree styles. Once you get your spot and figure out the roll out you are going to be using, spend a considerable amount of time training. Here you want to train your mind to ‘consistently react’ by repetition.
PHASE 2: Short Interval Practicing
After you get to a point where you are comfortable with ‘your spot’ you should go to the next phase of practicing which I will call ‘segment practicing’. The goal here is to train in segments or short intervals (I like to hit the tree 10x and then walk away). By keeping your sessions short, you have a greater chance of giving your brain 100% focus on the tree. The longer the sessions, the more like a game it will seem like and the more of a chance you give your mind to wander. The more your mind wanders, the more inconsistent your reaction times will be and the more inconsistent your reaction times are the less confident you will be in your abilities. Needless to say, an important goal here is to build your confidence, not to diminish it. So, don’t treat it like a game. Hit it 10x, document your results and look for consistency and improvement.
PHASE 3: Create Real Race Situations
The last phase of practicing is where I really want you to put yourself to the test. Here I want you to take a piece of paper and write on it ‘time trial 1’, ‘time trial 2’, ‘eliminations round 1’, ‘eliminations round 2’, all the way to the final round. The important thing here is to make one run and leave for a while then come back and make another run. Spacing the ‘rounds’ apart exactly like you do at the races will 1)- force you to out every ounce of focus you have into that round and 2)- create a real race feel. I even go as far as writing down who my opponent is (you can make up opponents based on who you typically race against) in that particular round and what reaction time I need to ‘win’ the round. This puts some pressure on you where if you lose, you are done and have to start all over another day. When you win the race you will realize that you can ‘do this’ and your confidence level will skyrocket. Bringing this confidence and ‘know how’ to the races will undoubtedly lead to more race wins.
Another effective way to simulate real race situations is to sit in by sitting in your own car and practicing in front of a full size practice tree. While doing this, don’t be afraid to throw your helmet and other safety equipment on. You can hook up the button in your car, (if you purchased a full tree package from us, we included the proper wire to connect the practice tree to the button in your car). When doing this, you should have the power off in your car and also disconnect your transbrake wires from your button. This is the best simulation you can get, if you can consistently achieve good reaction times here, you can confidently go to the races knowing you can do this and do it well.
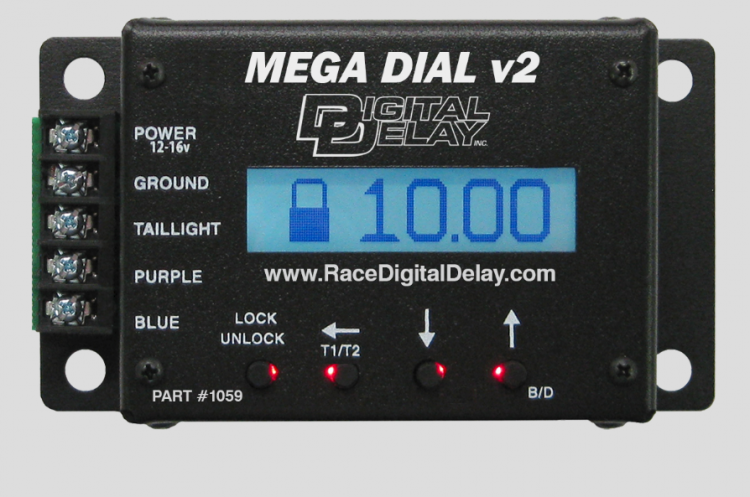
Using the MEGA 100, and MEGA 200 Delay Boxes
TIPS ON THE MEGA 200/100
* Before mounting the unit, put power to it and be sure you can easily view the information in both day and night conditions. If the unit is mounted far below or above “eye” level, it may have to be tilted for best viewing. Keep power to it, as this is the easiest way to go through and learn how the box works.
* This box was designed to be very user friendly, please take a few moments to learn it’s features.
* When you are racing, most of the time you will want to look at either the dial ins or the delay times. Pressing the 1 key will bring up dial ins while pressing the 2 key will bring up delay times. You will notice that the words “your dial” etc. are also written and lit up on the screen for ease of use. If you want to change a dial in or delay time simply press the corresponding * or # key and then enter a new value. This is all you need to know to operate the crossover delay box portion of this box.
* The numbers 3-9 will allow you to access all the other “extra” features in the box. If you intend on using any of these features, go through them and set them up to your racing application. It should be noted that they only need to be set up once.
* If you are using the replay tach feature on the Mega 200, the instructions show that you need a pushbutton or switch wired to the linelock terminal to arm the unit for recording. It is recommended that you use your linelock/ 3-step button for this. (The unit doesn’t actually start recording until the transbrake releases. It is also recommended that you wire a “bypass” toggle or pushbutton switch for backing up- if your trans requires you to apply the transbrake when backing up. This way the unit will not start recording after you back up. To wire this, simply run 2 wires off your bypass switch, one to 12 volts and the other to the transbrake terminal on the delay box).
* If you have the unit programmed to shift, the signal will not go out to your shift solenoid unless the transbrake button is activated first. This will ensure that the unit will not shift in the burnout or pits. Note: After the transbrake button is released, the keypad will be “locked” until the shift point is reached or 15 seconds- whichever comes first. This is more of a reason to run a bypass button (as stated earlier) if you use your transbrake button to back up.
* If you are a first time delay box user or a pro tree racer and do not intend on hitting the tree twice (their top yellow and your top yellow), set the pushbutton mode to 2. This will tell the box that your single pushbutton is used to activate delay 1 only. This way, delay 1 will recycle every time you hit your pushbutton. Only change this to pushbutton mode 1 if you intend on hitting the tree twice with 1 pushbutton.
* When wiring the box, be sure to run a (15 amp) in-line fuse in the transbrake line (this will help protect the box if your tranbrake solenoid or wire shorts out). It is also a good idea to run a fuse in the 12v wire, t/stop wire, and the shift wire for additional protection. Also note that the shift wire should be run separately from the other wires (not in a wire loom with the others), this will prevent the shift wire from “spiking” other wires.
If you have any further questions, you can contact us at 732-683-0404 or call Digital Delay direct at 563-324-1046. Or if you need to view the full instruction manual Click Here.
GOOD LUCK RACING!!!
Using the MEGA 300, and MEGA 400 Delay Boxes
HERE IS A BRIEF OVERVIEW AND SOME TIPS TO GET YOU STARTED WITH THE MEGA 300/400: Before mounting the unit, put power to it and be sure you can easily view the information in both day and night conditions. If the unit is mounted far below “eye” level, it may have to be tilted up for best viewing. Keep power to it, as this is the easiest way to go through and learn how the box works.
“C” KEY- press this key to bring you to the “main” screen which displays your dial-ins and delay times. This is the screen you will be spending most of your time in. If you run a throttle stop you will be frequently using the 4 stage timer screen. You can access this screen by pressing the “E” KEY.
“D” KEY- pressing this key brings up most of your “one time set up” information. Spend a few moments to set these features to your specific racing “style”. These are items that only need to be set up once.
“F” KEY- pressing the “F” key allows you to access the features related to the Tach, replay, shifting, and driver reaction tester.
As you will notice, every screen that you bring up has the display information written (in plain English) and lit up on the screen, making it nearly impossible for you to screw up. After you have selected the information, you can change it by pressing the “A” or “B” KEY that corresponds to the information that you want to change and entering a new value.
* If you are using the replay tach feature on the Mega 400, the instructions show that you need a pushbutton or switch wired to the linelock terminal to arm the unit for recording. It is recommended that you use your linelock/ 3-step button for this. (The unit doesn’t actually start recording until the transbrake releases. It is also recommended that you wire a “bypass” toggle or pushbutton switch for backing up- if your trans requires you to apply the transbrake when backing up. This way the unit will not start recording after you back up. To wire this, simply run 2 wires off your bypass switch, one to 12 volts and the other to the transbrake terminal on the delay box).
* If you have the unit programmed to shift, the signal will not go out to your shift solenoid unless the transbrake button is activated first. This will ensure that the unit will not shift in the burnout or pits. Note: After the transbrake button is released, the keypad will be “locked” until the shift point is reached or 15 seconds- whichever comes first. This is more of a reason to run a bypass button (as stated earlier) if you use your transbrake button to back up.
* If you are using a single throttle control to function as both a starting line control and a downtrack throttle stop, you should hook your wire from your throttle stop terminal on the box and run a jumper wire from this terminal to the S.F.O. terminal.
* If you are a first time delay box user or a pro tree racer and do not intend on hitting the tree twice (their top yellow and your top yellow), set the pushbutton mode to 2. This will tell the box that your single pushbutton is used to activate delay 1 only. This way, delay 1 will recycle every time you hit your pushbutton. Only change this to pushbutton mode 1 if you intend on hitting the tree twice with 1 pushbutton.
* When wiring the box, be sure to run a (15 amp) in-line fuse in the transbrake line (this will help protect the box if your tranbrake solenoid or wire shorts out). It is also a good idea to run a fuse in the 12v wire, t/stop wire, and the shift wire for additional protection. Also note that the shift wire should be run separately from the other wires (not in a wire loom with the others), this will prevent the shift wire from “spiking” other wires.
If you have any further questions, you can contact us at 732-683-0404 or call Digital Delay direct at 563-324-1046. Or if you need to view the full instruction manual Click Here.
GOOD LUCK RACING!!!
Using the MEGA 450 Delay Box
The TIP SHEET was written by the racers at Biondo Racing to give you an overview of how the box works. Powering the box up and going through it with the tip sheet in hand is the fastest way to learn it. If you have any set up or function questions call Biondo Racing at 732-683-0404. For further questions or any problems call Digital Delay Direct at 563-324-1046.
Before mounting the unit, put power to it and be sure you can easily view the information in both day and night conditions. If the unit is mounted far above or below “eye” level, it may have to be tilted for best viewing. Keep power to it, as this is the easiest way to go through and learn how the box works.
PRO TREE MODE AND BRACKET MODE
The concept of the Mega 450 was to make things simple for racers. To do this, the Mega 450 has a separate mode for pro tree racers. The settings in this PRO TREE MODE are independent and separate from the settings in the BRACKET MODE. This means that you can switch back and forth from Pro Tree racing to Bracket racing without having to change any of the settings. All settings in each mode are retained in the memory (even when you switch modes or shut the power off.) To get into PRO TREE MODE press the SETUP key followed by the PRO/ 9 key. At this point you will see the words ‘PRO SCREEN’ and all of your “PRO TREE” settings (pro tree delay, throttle stop timer, and shift point setting) will show up.
BRACKET MODE
To switch back to BRACKET MODE simply press the ‘BRKT’ key. Pressing the ‘BRKT’ KEY (‘BRKT’ stands for BRACKET race) brings you to the main bracket screen which shows dial ins and delay times. If you are a bracket racer, this is the screen you will be spending most, if not all, of your time in.
‘SET UP’ KEY- pressing this key allows you to view all of your setup information, along with the reaction tester and replay tachometer. You can access a total of 8 setup screens with the SETUP key. Each time you press the SETUP button you will scroll through the different setup screens. If you want to go directly to a specific setup screen, you can do so by pressing the SETUP key followed by a number key.
EXAMPLE: The Shift Information screen is considered setup screen number 6. To access this screen you can either: repeatedly press the SETUP key until you get to that screen, or you can go directly to it by pressing the SETUP key followed by the number 6.
Note: Whether you are on the main bracket (dial ins/ delays) screen or any of the setup screens, you are still in bracket mode.
Note: Spend a few moments to set up the box to your racing style (shift point, pushbutton mode, etc). All these settings need only to be done once and are retained in the memory even when power is shut off.
PRO MODE
The ONLY way to get into Pro Mode is to press the ‘SETUP’ key followed by the PRO/ 9 key.
As stated above, the Pro Mode has one main “PRO SCREEN” that shows all of your pro tree racing settings. There are only 2 other screens you can access while in Pro Mode. These screens are the driver reaction tester and replay tachometer. This allows racers to use the driver reaction tester or view the replay tachometer while in the pro mode. Pressing the SETUP button while on the PRO SCREEN will scroll through these other 2 screens.
THE KEYPAD
‘NEXT’ KEY- pressing this key allows you to move the selection arrows from one line to the next. Ex: If the selection arrows are on “your dial” and you would like to go to “their dial”, you would hit the next key to move the selections arrows to “their dial”.
‘CLEAR’ KEY- after you have selected the line you would like to change, you can hit the clear key to erase that line. After that, you can enter a new value by using the number keys. Ex: If you want to enter a new value for “their dial” simply move the selection arrows next to “their dial” and press the clear key. Use the numeric keys to type in a new value.
SCROLLING UP/ DOWN KEYS- these UP and Down arrow keys on the keypad allow you to make small changes to Dial ins, Delay Times, etc.
Ex: If you want to add 2 thousandths to “delay 1” simply move the selection arrows next to “delay 1” and press the UP arrow key twice.
THE DISPLAY
The display is a large screen that has 4 lines of information on each screen. All the display information is written in plain English, making it very easy to use. The display also has selection arrows showing the line that is currently selected.
OTHER TIPS
- If you are using the replay tach feature on the Mega 450, the instructions show that you need a pushbutton or switch wired to the linelock terminal to pre-arm the unit for recording. It is recommended that you use your linelock/ 3-step button for this. The unit doesn’t actually start recording until the transbrake releases. It is also recommended that you wire a “bypass” toggle or pushbutton switch for backing up- if your trans requires that you to apply the transbrake when backing up. This way the unit will not start recording (and will not cycle your delay times and throttle stop times) after you back up. To wire this simply run 2 wires off your bypass switch, one to 12 volts and the other to the transbrake terminal on the delay box)
- If you are using a single throttle control to function as both a starting line control and a downtrack throttle stop, you should hook your wire from your throttle stop solenoid to the throttle stop terminal on the box and run a jumper wire from this terminal to the S.F.O. terminal.
- Set the pushbutton mode to your racing style. If you are going to hit the tree only once each run, then set it to pushbutton mode 1. This will tell the box that your single pushbutton is used to activate delay 1 only, and it will allow you to “recycle” delay 1and get back on the button if you flinch before the top light. If you are going to hit the tree twice with 2 separate pushbuttons, set it to pushbutton mode 2. If you are going to hit the tree twice with 1 pushbutton, set it to pushbutton mode 3. (this differs from the 400 box)
- When wiring the box, be sure to run a (15-amp) in-line fuse in the transbrake line (this will help protect the box if your transbrake solenoid or wire shorts out). It is also a good idea to run a fuse in the 12v wire and the t/stop wire for additional protection.
- If you are using the Mega 450 to shift the car, keep 2 things in mind:
When testing the shifter in the pits be sure to press and release your transbrake pushbutton first as that is when the units starts looking for the shift point
When wiring the shift solenoid wire to the box, try and isolate the shift wire and keep it as far away from the other wires as possible. This will prevent the shift wire from spiking other wires.If you have any further questions, you can contact us at 732-683-0404 or call Digital Delay direct at 563-324-1046. Or if you need to view the full instruction manual Click Here.
GOOD LUCK RACING!!!Tips for a struggling “Bottom Bulb” Racer
Sal and Peter would like to share with you a little something that may help a “bottom bulb” racer with his / her reaction times. There are times when we feel “lost” on the bottom bulb. Those are the worst days for any racer, you have a lack of confidence, and it may take you weeks to get back “on track”. But, we tried something with a few racers who could not get their “bottom bulb” reaction times consistent. We have also used this method to prove to racers that they may or may not be using the correct rollout in the practice tree.
The main idea is to leave as soon as you see the bottom bulb, react to the “flash”, that is what makes you consistent. But due to the “distraction factor” of the top two ambers we can sometimes be inconsistent. So, what we suggest to do is the following : take the top two ambers out in each lane, you can do this with the table version “Final Round 2, or 3” by unscrewing the top 2 lenses, and pulling out the bulbs. The bulbs can not be pulled out of the versions with the LED bulbs, such as the Final Round 4 (FR4), but the FR4V2 model has an option to shut the bulbs off) Or, you can do this with the Full Size Tree by simply unscrewing the bulbs. This makes it easier to put your focus solely on the botton amber. (Of course you should make sure there is no handicap set in the unit, because we want your bottom amber to come on before, or simultaneously with the bottom amber in the other lane).
React to that amber as fast as you can, (for those who are not used to this, it may take a few shots). This may take some more concentration now, since we don’t have the top two ambers giving us the warning of the third coming on. But, those two top two ambers are there for no other reason but to distract you!!
With this method we can now figure out the rollout to use in the practice tree by adjusting the rollout number until you are in the 5 – teens, or 5 – twenties. After you have established an average competitive reaction time, you are ready for the final step:
Put all the bulbs back in, leaving the rollout number the same, and “hit” the tree just as you did before. Try to forget that the top two ambers are there. If your reaction times are about the same and as consistent as they were before, you are learning to master the full tree, which is the hardest “tree” to conquer. (it requires the most discipline). If you master that, set the tree up, so that you give the other lane a 1/2 second or full second handicap, because that will create more distraction, and if you can master that, then you are ready for anything.
A Quick Tip to improve your “Finish Line Driving”
(This section written by Sal Biondo)
I never claimed to be the best finish line racer out there…But, on the same note I’ve seen people out there who are worse than me. But, for some reason or another, I’ve had dozens of people come up to me and ask me how they could become a better “Finish Line” racer.Well, the answer is simple, I think. Race as much as you can, and with the experience you gain, in time, your “Finish Line” driving will improve. I’m only kidding, I would not make you come to this section and just tell you to race more often.
I really did think of a method to improve a racer’s “Finish Line” driving. For the most part, it is best applicable for “Super” racers, who make time trials alongside racecars that run almost the same E.T. as each other. What I suggest is this: when making your run, always check out your opponent as you are headed down track. (Of course, don’t do this if you are fighting the car, or there are some severe side winds present! I’m assuming that everyone who enters this section is an experienced drag racer, and I don’t need to give out driving lessons!) When you approach the finish line…. that is where I suggest you pay the most attention. What you should do is take a look over, and see where you are in comparison to your competition. Keep a mental note of that distance, and try to decide who got to the finish line first, and by how much. Decide on a number before you pick up your time slip, and see how close you can get. If you do that all the time, you may get a better idea of what’s going on at the finish line.
I can’t tell you how many runs I see from the finish line, even during time trials, and I see racers looking straight ahead. Maybe sometimes you need to keep your eyes on the guages, or other times you can see well out of your “peripheral vision”, but when its real “tight” during a time run, I’ll always use that time to try and learn something.
This method of guessing who got to the “stripe” first, and by how much should be done during eliminations also. I know it’s probably the furthest thing from your mind when you are at a big race, but think of the long term benefit it could have. For dial-in racers, eliminations are probably the only time you can practice this method. I know in all my past experience of making time runs in brackets and Super Stock, I’ve rarely made a run with someone who ran within a couple of hundredths of me.
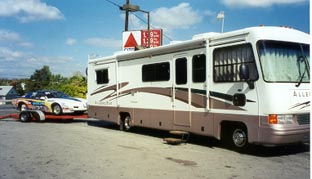
This is more like a travel tip – Grease Your Bearings!
When you are driving down the road, and you look in the mirror, and there is smoke billowing from your trailer…..pull over, or get to the nearest exit and examine the problem.
When you do examine the trailer, and one of your wheels looks like the above photo, you or a mechanically inclined friend, (thanks Ken Miele) must examine things a little further.
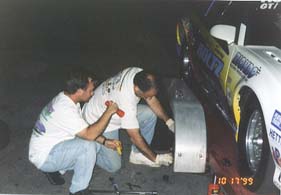
When you need parts, and they are not readily available, you may have to wait around for a while. Moral of the story….Grease your wheel bearings often!! (Sorry Dan Fletcher – I don’t want to sound like your National Dragster column, but they also call me “lucky”.)